home > support > image resizing
Image resizing (for RTF documents)
Introduction
RTF documents are used as templates within TourCMS to generate invoices, welcome packs, pre-trip documentation etc. For more information see the documentation manual:
 Documentation manual (Emails / Invoices)
If you are having problems getting the filesize of your RTF files down to the 1MB limit in TourCMS read on...
In Microsoft Word when you resize an image by dragging the the corners it only appears to get smaller, your document still contains the larger image behind the scenes. This is handy if you ever need to come back and make the image bigger again but bad for your filesize.
The best results are obtained by resizing images in an image editing application BEFORE placing them in Word however you may get perfectly acceptable results just using Word itself.
Different ways of resizing images
Resizing images in Microsoft Word 2007 and newer
You should make these changes once you are happy with the placement, sizing and crop of the image within your document, if you are still adjusting the layout then come back to this when your document is finished.
- Double click on the image in Word so that it is selected, you should see the "Picture Tools" "Format" bar appear in the ribbon at the top, it will look something like this:

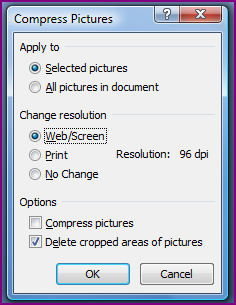
- Click "Compress Pictures" (highlighted yellow in the screenshot above), use the following settings and then click "Ok":

- Here we've changed the setting for the Resolution to "web/screen" and unticked "Compress pictures". Leaving "Compress pictures" ticked would produce an even smaller filesize however it tends to reduce the quality, only tick this box if absolutely necessary.
Now when you save your document the filesize should be much smaller. If you need to come back to your document and make the images larger again you will need to re-import your original image otherwise it will look blurred.
Resizing images in Microsoft Word 2003
You should make these changes once you are happy with the placement, sizing and crop of the image within your document, if you are still adjusting the layout then come back to this when your document is finished.
- Right click on your image and select "Format Picture" in the menu that opens up.
- Click "Compress" to open the Compress Pictures window
- In the Compress Pictures window set "Change resolution" to "Web/Screen" and untick "Compress pictures" (you could leave this option ticked for an even smaller filesize however it tends to reduce quality).
- Click "Ok" until you are back in your word document
Now when you save your document the filesize should be much smaller. If you need to come back to your document and make the images larger again you should re-import your original (larger) image otherwise it will look blurred.
Resizing images by using an image editing application
This is based on the default settings in Microsoft Word, if you have altered the dpi settings of your document or are using another piece of word processing software your results may vary slightly*.
You don't need to know exactly the size in cm/inches you want - best to guess a bit larger than you actually need.
- Paint.Net (free download)
- Open your image
- In the toolbar click "Image" > "Resize"
- In the window that opens ensure "Maintain aspect ratio" is ticked and "Resolution" is set to 96.00 pixels/inch then just type the size you want in Inches in the "Print Size" box.
- IrfanView: (free download)
- Open your image
- In the toolbar click "Image" > "Resize/Resample"
- In the window that opens ensure "Preserve aspect ratio" is ticked and DPI is set to 96 then just choose either Inches or cm and then type in the size you would like.
- Adobe Photoshop
- Open your image
- In the toolbar click "Image" > "Image Size..."
- In the window that opens ensure "Constrain proportions" is ticked and that "Resolution" is set to 96 pixels/inch then type the width or height you want in the "Print size" section
Once your image is resized you should Save As / Export. If your image has lots of different colours / detail (such as a photo) it's usually best to save as a JPEG however if it has only a few colours (like a logo or chart) it's usually best to save as a GIF.
*Detailed explanation: Your computer sees your image as a series of dots (called pixels) however those in the print world will be more used to the term "dpi", dpi is just the number of these dots per inch. Microsoft Word by default uses a dpi of 96, this means that for every inch of image you have 96 dots. If you want your image to appear 2 inches wide by 1 inch tall you should resize it to be 2x96 wide by 1x96 high (or 192x96 pixels).
