home > support > solution library > booking engine > tracking via google analytics
Legacy 'Asynchronous' tracking code
JavaScript tracking tags can be placed on the first and last pages of the booking process via Channel Manager. This tutorial details some of the considerations for using this with the popular Google Analytics service however the techniques should be applicable to other similar solutions.
This page uses the older 'Asynchronous' tracking code, view the latest 'Universal Analytics' code.
For more information, check legacy library Google Analytics documentation.
A note on Marketplace Bookings
When a booking is made via the TourCMS Marketplace your JavaScript code will not be used, thus any bookings made via this method will not show in your Google Analytics.
Basic tracking
As the TourCMS Booking Engine is hosted on a different domain to your website two small changes need to be made to the code on your website so that Google Analytics can track users correctly:
Step 1: Tweaking the tracking tags
The first step is to add the following two lines to the standard tracking code that you received from Google:
_gaq.push(['_setDomainName', 'none']);
_gaq.push(['_setAllowLinker', true]);
Thus the full standard tracking code would be as follows:
<script type="text/javascript">
  var _gaq = _gaq || [];
  _gaq.push(['_setAccount', 'UA-XXXXXXXX-X']);
  _gaq.push(['_setDomainName', 'none']);
  _gaq.push(['_setAllowLinker', true]);
  _gaq.push(['_trackPageview']);

  (function() {
    var ga = document.createElement('script'); ga.type = 'text/javascript'; ga.async = true;
    ga.src = ('https:' == document.location.protocol ? 'https://ssl' : 'http://www') + '.google-analytics.com/ga.js';
    var s = document.getElementsByTagName('script')[0]; s.parentNode.insertBefore(ga, s);
  })();
</script>
In addition to tweaking the code on your product page this tracking code should also be added to the TourCMS Booking Engine itself. This can be achieved by logging into TourCMS then heading to Channel Manager > Tracking & Analytics and pasting the code into the relevant box for any step you wish to track. For the purposes of Google Analytics you will likely initally want to copy the same code into each box. UA-XXXXXXXX-X should be replaced with your own Analytics account ID.
Step 2: Tweaking the booking engine links
Google Analytics also needs to add some extra information to the end of the standard booking engine links when the user clicks on a them so that it can track them correctly, we have instructions below for those loading the booking engine via normal (full screen) links and a second set of instructions for those loading the booking engine in a popup window.
If you use normal / full screen links
We use the Google Analytics _link() functionality.
The HTML for a standard Booking Engine link on your website will look something like this:
<a href="https://live.tourcms.com/reserve/r1.php?t=7&a=828&w=486&ty=t&k=3c800be4e2a9">Book online</a>So that Google Analytics can correctly track the user as they leave our website and go to the TourCMS booking engine we need to add a special onclick attribute with the value _gaq.push(['_link',this.href]); return false; to the above standard HTML giving us something like:
<a href="https://live.tourcms.com/reserve/r1.php?t=7&a=828&w=486&ty=t&k=3c800be4e2a9" onclick="_gaq.push(['_link',this.href]); return false;">Book online</a>If you are using TourCMS templates to build your website, the following template code can be used
<a href="<$TourCMStour output="t_book_url"$>" onclick="_gaq.push(['_link',this.href]); return false;">Book online</a>If you are using a third party CMS to manage your website content you may need to investigate how to add "onclick attributes" to links.
If you use popup links
There is some code required for this so we have provided a JavaScript file that you can include in your web page to make things easier.
First download the JavaScript file and place it on your web server (if you want to see the code get the non-minified version).
Include the JavaScript file in your web page with the following code:
<script src="/tourcms-gaq-popup-1-0-min.js"></script>Then tweak your booking engine links slightly, adding an onclick attribute that calls the new code:
<a href="https://live.tourcms.com/reserve/r1.php?t=7&a=828&w=486&ty=t&k=3c800be4e2a9&if=1&ifwidth=720" onclick="return gaq_popup(this);">Book online</a>The default size of the popup window is 720px wide and 600px tall, you can control this by adding data-width and data-height attributes to your links. The following code will produce a popup window that is 800px wide and 400px tall:
<a href="https://live.tourcms.com/reserve/r1.php?t=7&a=828&w=486&ty=t&k=3c800be4e2a9&if=1&ifwidth=800" onclick="return gaq_popup(this);" data-width="800" data-height="400">Book online</a>If you are using TourCMS templates to build your website, the following template code can be used:
<a href="<$TourCMStour output="t_book_url"$>&if=1&ifwidth=800" onclick="return gaq_popup(this);" data-width="800" data-height="400">Book online</a>If you IFRAME the booking engine
The first thing to do is to give the IFRAME that is holding your booking engine an ID, like so:
<iframe id="myIFrame" src="https://live.tourcms.com/reserve/r1.php?t=7&a=828&w=486&ty=t&k=3c800be4e2a9&if=1&ifwidth=780" style="width: 800px; height: 1000px;"></iframe>Then add the following to your Google Analytics tracking code for this page, under the _gaq.push(['_trackPageview']); line.
_gaq.push(function() {
	  var pageTracker = _gat._getTrackerByName();
	  var iframe = document.getElementById('myIFrame');
	  iframe.src = pageTracker._getLinkerUrl(iframe.src);
	});
Checking the tweaked links are working
To check if this is working correctly just click on one of your updated "Book online" links, once you get to the first step of the TourCMS Booking Engine take a look at the location bar of your web browser. You should see that you are at a web address beginning https://live.tourcms.com..., you will know the _link( ); function has worked if you can see extra parameters like __utma, __utmb etc have been added on to the end of the standard booking engine link.
The following screenshot taken from our demonstration website TourSift (which has Google Analytics tracking in place) shows where to look for these:
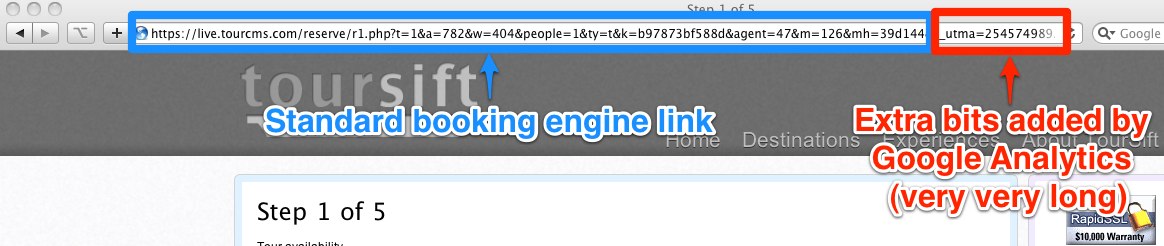
Once this is complete you should start seeing booking engine Step 1 and Step 5 pages showing up in your Google Analytics reports. If funnels aren't working correctly - meaning you can't see where customers came from to get to Step 1 - then it's possible you haven't completed this second step correctly.
It's a little bit trickier to check the Iframe code has worked as browsers don't generally show the URL of iframed content. One trick in some browsers is to right click in the Iframe and select "Open Frame in new window"). If you aren't sure just fire us an email and we can take a look for you.
[Optional] "Goal" Tracking
A goal in Google Analytics is a simple way to track the success of a process completed by a user, in this case a completed booking.
To set up a goal for a completed TourCMS booking:
- Log into your Google Analytics account, head to your Profile settings, click Edit on the Profile then click Add a Goal
- Enter a meaningful Goal Name (such as "Booking made")
- Set the Goal Type to "URL Destination".
- Set the Match Type to "Head Match" and enter "/reserve/r6.php" (without the quotes) for the Goal URL
Once this is completed you should start seeing completed Goals in your Analytics when bookings are made (Google Analytics reports are not updated immediately so the stats may trail behind live bookings).
If you have an enquiry or brochure request form you may want to set that up as a Goal too.
[Optional] E-commerce tracking
This is a fairly advanced step, you may find it easier to track the success of campaigns or partners using the standard TourCMS affiliate / agent tracking (perhaps via the TourCMS Marketplace).
Google Analytics allows tracking of e-commerce items such as orders and products, this is entirely optional but can be quite powerful. Setting up E-commerce tracking on your account is a two step process.
- Log into your Google Analytics account, head to your Profile settings, click Edit on the Profile and change the E-Commerce Website setting from No to Yes
- Add some additional code to the basic tracking previously entered into TourCMS, this is detailed below:
The extra tags we will be adding use the addItem(), addTrans() and trackTrans() Google Analytics Methods. addItem() will be used to record details of the main Tour/Hotel that is being booked (for Multi-room Hotel type bookings you may wish to leave this out as it may be less relavent), addTrans() will be used to record the details of the booking itself (booking ID, total amount etc) and trackTrans() tells Google Analytics that we are done adding data to the transaction, so that it can be stored.
The following text should be added to the code from the Basic tracking section above into the box for Step 5 - Thank you page only, on the line after _gaq.push(['_trackPageview']);. The TourCMS tags used should be fine for most cases however their usage and possible alternative tags are detailed in the Documentation manual (Emails / Invoices)
_gaq.push(['_addTrans',
   '%b_id%',           					// order ID - required
   '', 									// affiliation or store name
   '%b_base_sale_price_total_inctax_exlp%',	// total - required
   '',           				// tax
   '',          				// shipping
   '%primary_contact_city%',       // city
   '%primary_contact_county%',     // state or province
   '%primary_contact_country%'	// country
]);
_gaq.push(['_addItem',
   '%b_id%',           // order ID - necessary to associate item with transaction
   '%t_code%',           // SKU/code - required
   '%t_name_web%',        // product name
   '',   			// category or variation
   '%t_price%',          // unit price - required
   '%customers_total%'               // quantity - required
]);
_gaq.push(['_trackTrans']);
As per the comments above Google Analtics stipulates that an Item must have an SKU/Code so if you are including the _addItem() section you must make sure you are filling that section in. In the example above we use the Tour code which is loaded in the Setup page for the Tour, you could make up a code if you don't already have codes for your products and you can hide the code from the rest of the booking process if it's not something you want your customers to see.
Once this is completed you should start to see Transactions and Items in your Google Analytics reports as bookings come in (again, it may take a while for bookings to appear in your reports).
More information
- "Tracking a 3rd-party shopping cart" - Google Analytics Help
- Back to the main Booking Engine support page
- Iframe / Popup window
- Querystring parameters
- Switch booking engines
- Custom HTML & CSS
- Tweaking Step 1
- Tracking & Analytics