home > support > solution library > product filters
Product Filters
(The feature formerly known as "Collections")
Introduction
Product filters provide a flexible way for you to organise your Tours into sets using your own custom fields. These filters can be used in various aspects of TourCMS where you wish to include/exclude a certain selection of your products such as:
- Staff booking process
When checking availability to make a new booking or when searching for existing bookings a Product filter can be used to refine the results - Restricted logins
You can limit staff user accounts so that they can only access certain products, this could be useful if you wanted to allow a supplier to log in to your account - but only to edit their own products - Reporting
When running the standard included reports or using the report designer to build your own you can optionally use a Product filter to restrict the products considered by the report - Online booking engine
The booking engine can optionally list a set of alternative products, this list can be based on a Product filter - Webdesign
If you are using our API to power your website you can generate pages containing groups of Tours (e.g. "Hiking Tours" or "Cycling Tours") using Product filters - Website channel / brand
You can choose to run multiple website channels / brands from a single TourCMS account, each can offer a subset of the products loaded in your account by using Product filters
This is a fairly advanced feature and is by no means required to use TourCMS, if none of the above use cases appeal to you then you can probably ignore Product Filters.
There is a two step process to define your Product filters:
- Create Categories & Groups
These are the aspects (attributes) of your products which you will use to build your filters, for example an Activity Operator in Scotland may have groups called "Activity type", "Location" and "Challenge". They are custom and can be whatever you like. - Create the Product filters based on these new Groups
Sticking with our Activity Operator example they may want a Product filter (set of products) called "Rafting in Aviemore", this simple filter would return all of the products with an "Activity type" of Rafting and a "Location" of Aviemore
The benefit of this approach is that once you have your Groups loaded you can quickly create many different Product filters, as you add more products/services to your account they will automatically drop into the correct Product filters.
Step by step example
Step 1 - Creating our Groups and Categories
First you will need to decide on some of the aspects you will group your products by. Some examples for an activity company have been given above (Location, Activity type, Challenge) whereas a chalet operator may want to create a "Catering" group to allow filtering by Catered / Non catered properties.
You can currently create up to five of these Groups and each can have as many possible values (Categories) as you like. Here's how to create one:
- Log into TourCMS, then from the homepage head to Configuration & setup then Categories & groups
- By default all five possible Groups will be deactivated. Click Activate Group on the first row, then click Edit
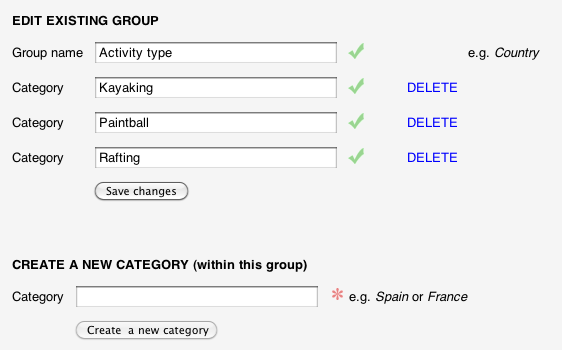
- In the Edit existing group box enter the name for your first group (e.g. "Activity type") and click Save changes
- In the Create a new category box add each of the possible values in turn (e.g. "Rafting", "Kayaking", "Paintball") clicking the Create a new category button inbetween each
- You should end up with something like this:
Step 2 - Setting the Categories for our Tours/Hotels
- Head to the Tours/Hotels section of TourCMS and click Setup for one of your Tours
- Under the Categories tab you should see rows of boxes for each of your categories. Move the ones related to this particular product to the right hand side, like so:
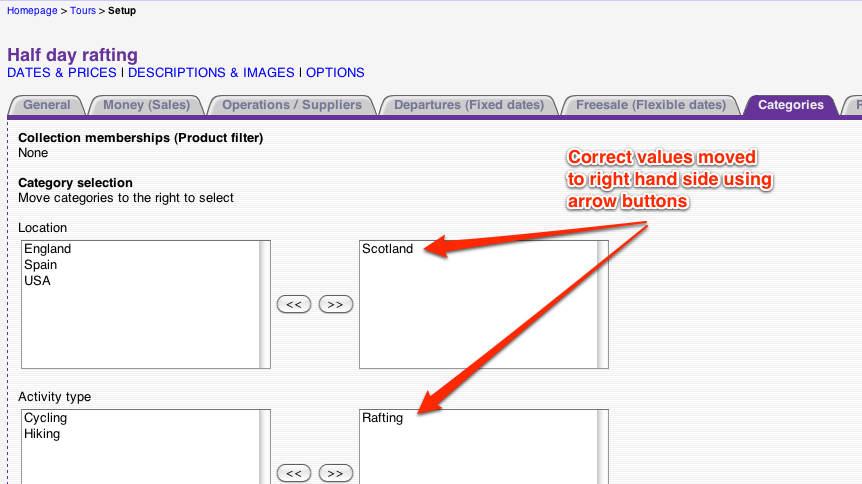
- Save your changes and then repeat for your other products
Step 3 - Creating our Product filters
The final step is to create the actual Product filters, these can use any combinations of the Groups & Categories we configured in Step 1 and once we have them set up our existing and new products will drop into the correct filters automatically.
- From the homepage head to Configuration & setup then Product filters (Collections)
- In the CREATE A NEW COLLECTION form enter a name for your filter then click Create a new collection
- Click Setup for the newly created item
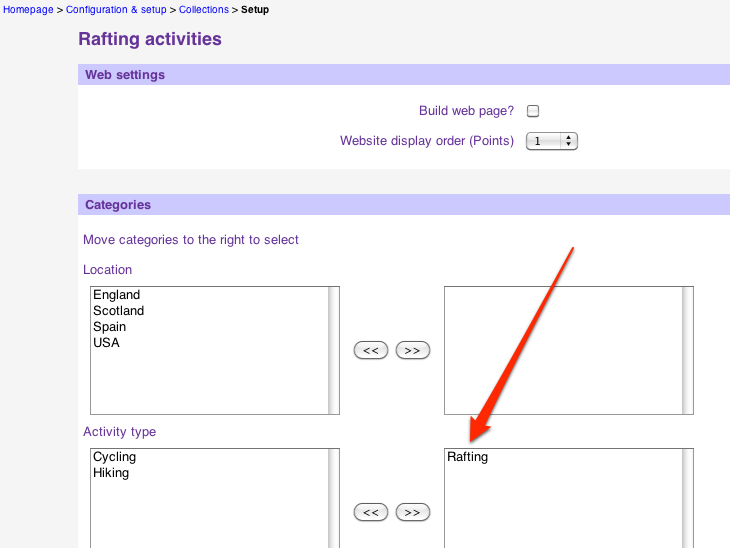
- If you are using TourCMS templates to manage your website content then you can tick the Build web page? box if you would like TourCMS to generate a web page for this collection (for example you could have an introductory paragraph of text followed by a listing of all of the products in this collection)
- Below that you should see a row of boxes for each of your categories (very similar to the Tour setup in Step 2 above). Move the correct values over to the right hand side using the arrow buttons, like so:
- Save your changes and repeat for your other Product filters (Collections)
Step 4 - Checking our Product filters
Your product filters are now ready to use, however there are a couple of different ways you can check they are working as you'd like:
- In the Product filters (Collections) page in Configuration & setup: The table shows the number of Tours returned by each product filter, clicking on the number lists the Tour names
- In the Product filters report in the Reports section of TourCMS: This report lists each of the product filters and the Tours returned by them
TourCMS sorts Tours into product filters behind the scenes, so it may take upto a few minutes for Tours to show up in a new product filter, or for new Tours to show up in existing product filters.
Using your Product filters
Once you have built your product filters they should be "Set and forget", all you need to do is ensure that you set the correct details on the Categories tab in Setup for each Tour/Hotel that you create (i.e. "Step 2" above).
For details on where product filters can be used scroll back to the top of this page.